
Window treatments can get very expensive when updating a home. I’m always looking for ways to save money while making my home beautiful and I knew that I wanted roman shades for my bedroom. I learned how to make roman shades with mini blinds and I love how they turned out! These window treatments were so inexpensive and I could customize them to look exactly how I wanted for my bedroom.
How to make roman shades with mini blinds? First, I cut your fabric to size and turn under the edges twice, then edge stitched all around. Next, clip all of the “ladder” like strings that hold the slats together. Then, measure out where you want the slats to go on your roman shade and use a ruler to draw lines on your fabric. Now you are going to glue the slats on the lines you made. Place your mini blind skeleton on the fabric, and weave those strings back through the holes in the slats. Now you need to glue back on the bottom bar. Lastly, take an extra strip of fabric, turn under and sewed up the ends and hot glue it onto the top white bar.

How To Make Roman Shades Using Mini Blinds
I have finally made some DIY window treatments for our bedroom. I decided on some roman shades.
It has taken me forever to start the project, but once I did it was so fast and easy!
I found a few different tutorials online (here and here) on how to make roman shades out of mini blinds. I adapted them and this is the method I came up with.
Materials Needed For How To Make Roman Shades Using Mini Blinds
Here’s what you will need to make 2 DIY window treatments:
2 yards of fabric (more or less depending on the size of your windows)
scissors
sewing machine
Directions For How To Make Roman Shades Using Mini Blinds
1. I cut your fabric to size and turned under the edges twice, then edge stitch all around.
All the tutorials I found were “no sew” which required gluing the fabric. I prefer sewing to make things look a little more professional, so I ended up with a large panel of fabric.

2. Now you need to take apart your mini blinds. Open it up and fully extend it. Clip all of the “ladder” like strings that hold the slats together.
Do NOT clip the larger inner string that goes through the center.

3. Now pop off the white circles at the bottom.

4. Now you can clip the larger attaching strings. This will allow you to take off all the slats.

Your blind should now look something like this.

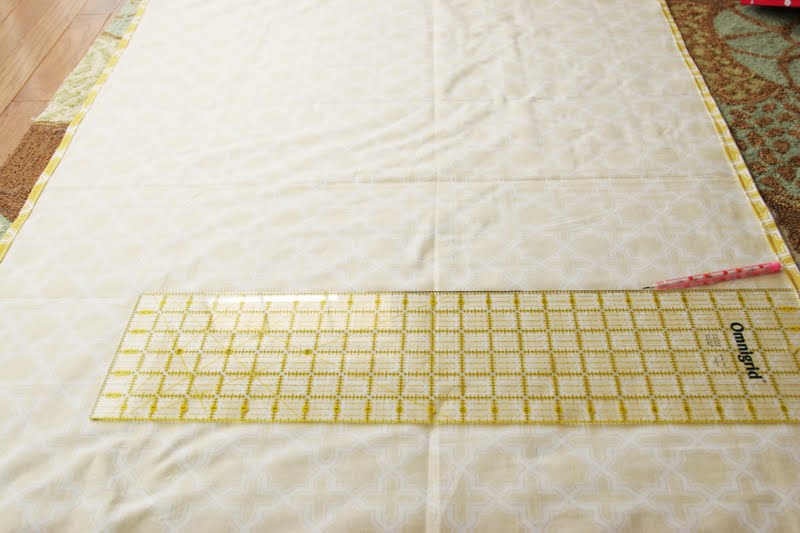
5. Next, you want to measure out where you want the slats to go on your roman shade…aka how many folds you want.
My fabric was 42 inches long, so I just made a slat every 7 inches. Using a ruler, draw lines on the back of the fabric with a pencil.
6. Now you are going to glue the slats on the lines you made. Using fabric glue on the convex side of the slat, smear it on.
I tried to smear the glue a little so that when it dried, it wouldn’t look like a distinct hardened line of glue from the outside if that makes sense.

7. Glue them all on as straight as possible. Make sure your fabric is really smoothed out so that there won’t be any wrinkles on the outside.

8. Now place your mini blind skeleton on the fabric, and weave those strings back through the holes in the slats.
You may have to pull the fabric away from the glue a bit to get it through, but it shouldn’t make anything fall apart.


This is the part I couldn’t figure out. You need to attach the top bar of the mini blind. All of the tutorials I saw attached it like this…but as you will see, the pulley strings (which you need to raise and lower your shades) would be covered up if you did it this way. I don’t know if my blinds are just different or if I was doing something wrong, but I knew this would not work for me.

9. Flip the top bar on its side and glued the fabric on the underneath side. (it will make more sense in the next few pictures) For this part, I used hot glue.
The other tutorials say to use fabric glue because hot glue might disintegrate over time. I felt like fabric glue wasn’t strong enough to hold this heavier piece. So, I guess we will see if my shades hold up. I figure the worst that could happen is it starts to fall off and I just re-glue it.
9. Now you need to glue back on the bottom bar. First, pull the strings through the holes and make knots.

10. Pop those little white circles back on and hot glue the bar flat against the bottom of the fabric.

You are not quite done! See how I glued the top of the fabric to the top bar? It’s hanging from the under side. The only problem is now that tacky white bar is exposed.

11. Take an extra strip of fabric, turn it under and sew up the ends, then hot glue it onto the white bar.

It’s not even noticeable now.

And you are done!! It’s so easy!! Now, I was prepared to add another layer of room darkening fabric, but I actually think mine are fine the way they are. If you like your room super dark, you could add this step.

They look nice up or down. (Pardon the paint on the windows, they still need to be scraped!)

The fabric folds pretty nicely when pulled up. Sometimes you may need to help the folds a bit with your fingers to make it look nicer.

And in case anyone is worried, right after I took these photos, I attached some little thingies to the window panes up at the very top to wrap the strings around to keep them out of reach of the kiddos. I don’t know what the technical terms are, but you know what I’m talking about. I was stressed out about doing this as soon as they were installed for safety reasons!

I really am pleased with how they turned out! And it was so much cheaper than buying them! Here’s the cost break down for me:
2 yards of Joel Dewberry fabric in Napsack @ $9/yard = $22 (tax + shipping)
2 sets of mini blinds off of Amazon @ 5 each = FREE (because I had giftcards earned with swagbucks!!)
TOTAL: $22
Store bought roman shades start around $35 each…so making them yourself will save you a ton…plus you can totally customize them to be exactly what you want!!
I’m planning on making some more DIY window treatments for the living room. Now to figure out what fabric to use…
LIKE WHAT YOU SEE? FOLLOW ME ON FACEBOOK AND PINTEREST!! And don’t forget to go check out my current post!
*This post contains affiliate links
